Family photographer based in Utrecht, NL.

Posts from the ‘Creativity’ category

I guess I’m in a phase of making projects with stars. Here is how I used some pretty adhesive fabrics to get this cute look.

This is a good idea for reusing old (but still good) clothes from my son. I just need to give them a girly look.

For those interested, just such for “Frou-Frou Tissu thermocollant”.

Body-estrelas

Leave a comment

Sling shot is very cool and easy to do.

All that we need is to find a stick in the right format, and I can say that this is the best part of it. My boy loved walking in the woods to find the sticks. We came home with huge sticks too, just waiting for mommy to have a little time to make a very big sling shot for him.

So I’ve found a colourful tape. Got some elastic and I sew it with a peace of cloth. That’s it! :)

1065037_10152955892280635_1715385426_o

Leave a comment

This is what we did one week before my little baby girl was born. :)

I can’t believe that I did it with my huge belly, though…

So I had a big cardboard from Ikea, blue wallpaper that I used as a prop in my studio, glue, tape, a pair of scissors and more colorful paper!

_AND8236-copy

My boy uses it as a ‘changing room’ some times… :)

1466157_10153421129265635_1519845641_n

Leave a comment

After a good week at school, my son started having runny nose last Saturday. I tough of keeping him home on Monday but it doesn’t look better, so he’s been with me now for two days and will be probably tomorrow at home as well. What to do to spend the days at home and still have the feeling that something productive was done? I thought… Stencil! Why not, I have a book that tells the technic and I have some Freezer-paper and Fabric paint at home.

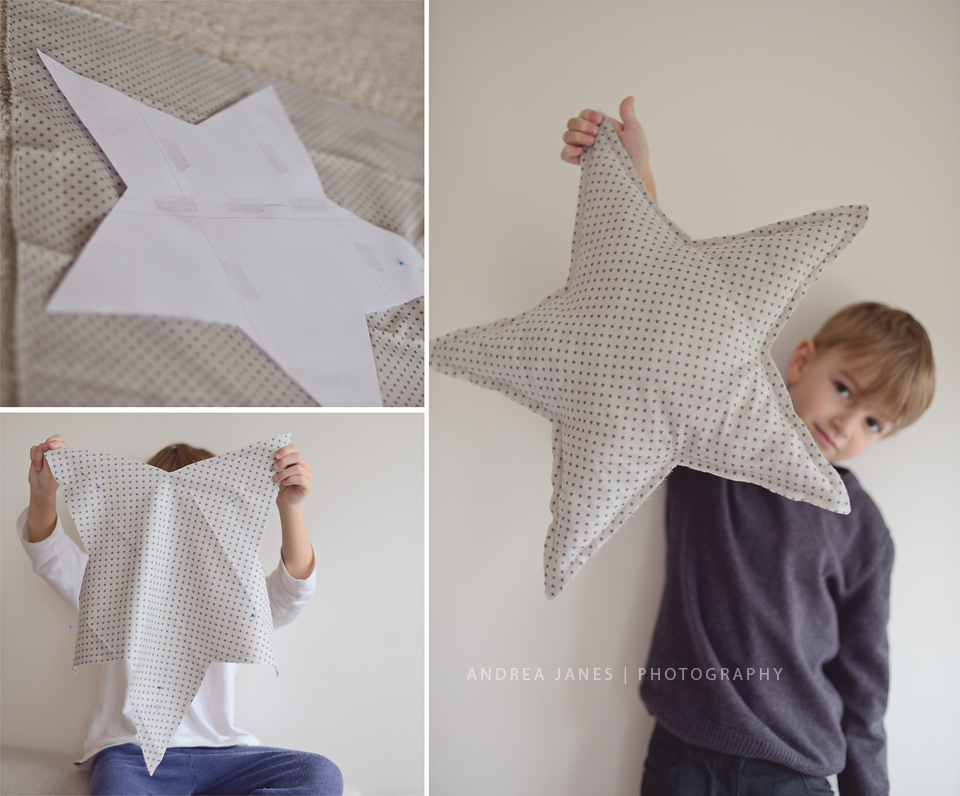
I will tell you how this one was made:

You need:

– Two sheets of freezer paper. (unfortunately it’s not easy to find it in Paris, but I ordered it online some months ago)

– Fabric paint. (I had a bit of brown)

– X-acto knife. (Theo wasn’t allowed to touch it)

– A self-healing mat.

– An image. I got this simple this one in the internet)

– Pen

– Iron (only parents)

– Fabric. (I got an old T-shirt as we are doing it for the first time)

____________________________________________________________________________________

1- Place the Freezer-paper over the image  and trace it with a pen (shine side down)

2- Cut the Stencil with the knife over the mat.

3- Set up the stencil shine side down on the T-shirt. Place the other Freezer-paper under the fabric, shine side up. (between the back and front)

4- Iron for 20 seconds the Freezer-paper and it will stick a bit on the fabric.

4- Apply the paint with a paintbrush or stencil brushes of the cutout area of the stencil.

5- Don’t remove the Stencil or move the fabric for 12 hours. (I explained to my son the need of it to be still for over night and he didn’t do anything. I’m proud!)

6- Next day remove the stencil and wash the fabric by it self with cold water. Next time I was told we can wash with other clothes…

Now, I will really take it seriously and we can get some new wardrobe soon! Nice!

1 Comment

My son’s Birthday Party was made um July this year, but I wanted to share it here. Many ideas I took from the internet and as he likes monstrers, oh yes, this was the perfect theme for him! Muffins and candies I made myself… (lot’s of work, I’d say!). The cake I ordered from a brazilian lady who lives in Paris and it was delicious! She printed my drawing and it was nice on the end! It was my first attempt making cake pops! So much fun!!!

Leave a comment

I’ve decided recently to slightly change our way of life. Reading a book that my husband bought for me called “the creative family” from Amanda Blake Soule, the things she says make sense.

I am a person who if staying a few days without creating, I start getting sick. Really! Why not to involve my son in many of these creations? We paint, draw, play play dough and cook together but I want to get him involved in different things. Even though he is not yet able to perform some things from start to end, he will be involved in parts of the project and still have that sensation that something special was also made by him.

We went to a local store that has various artistic materials and I saw pieces of colored felt. In the book I’ve mentioned, Amanda teaches how to make felt blocks. It’s easy and we don’t need to have a sewing machine. It’s only necessary to thread a needle by hand. I also bought some felt monsters, very nice ones.

Back home I realized that I didn’t have felt enough for the size of the monsters, so I decided to make a different shape. I started cutting some triangles. In this step, my son could pull the sewing needle to me, with my total supervision.  I’ve found a pillow from IKEA that we don’t use and was really cheap so I opened it without regret. My son filled the diamond shape with the soft fur, and then he pasted the little monsters on some of the faces of the diamond.

I’ve finalized it with colored sewing thread. ;)

Leave a comment